
Top bar and Menu
The top bar runs along the top left of the editor. It holds the way home, the Menu, undo, the view controls, Preview, your project's name and Share.

- Home: the Paraplex button takes you to the home page. Your scene stays open behind it: your browser's back button returns to it as you left it.
- Menu: projects, exports, imports, and the scene's formats and settings. Everything is described below.
- Undo and Redo: ⌘ Z and ⇧ ⌘ Z. On Windows, Ctrl Z, and Ctrl Shift Z or Ctrl Y. They're dimmed when there's nothing to undo or redo.
- Reset view: puts the camera back to the scene's home view (F). See Moving around the canvas.
- 2D: turns 2D design mode on and off (D). While it's on, two buttons appear beside it: the design grid and 8pt snapping. See 2D design mode.
- Preview: try your piece the way a viewer would. The button turns green while Preview is on.
- Project name: Untitled for a blank file, the template's name for a template, until you name it. Click it, type a name and press Enter, or press Esc to cancel. A template you've changed shows its copy's name, such as Card stack (Copy).
- Share: a link to watch your piece, a copy to edit, or an embed.
Two more buttons can appear at the end of the bar:
- Notes · 3 (with your count) shows or hides the scene's notes. It appears only when the scene has notes. See Notes.
- Sign in opens your account. Once you're signed in, it shows your email and your remaining credits. See Account and sign-in.
Share
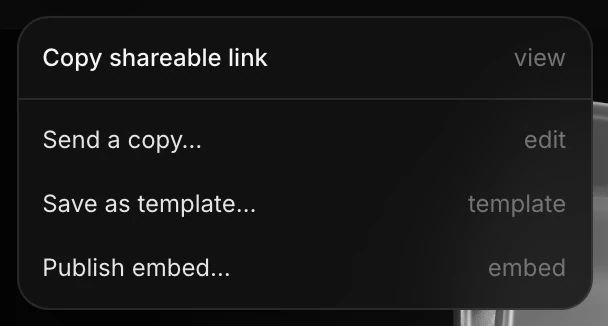
| Item | What it does |
|---|---|
| Copy shareable link | Publishes your piece as a web page and copies its link. After you make changes, choose Refresh shareable link to update the page. The link stays the same. |
| Send a copy… | Makes a link that gives someone their own editable copy of the project. The project has to be saved first. |
| Save as template… | Publishes the scene as a template of yours, for the Showcase or just for you. |
| Publish embed… | Gives you the code to put the piece on a website, with the option to share it in the community gallery. |
All four need you to be signed in. See Share links and copies, Save as template and Publish and embed.
Preview
Click Preview to use your piece as a viewer would. Hover, click and drag work on layers that have behaviors, and scrolling can drive the timeline. A bar appears at the top:

- Camera: how a viewer can move the camera: Orbit, Look around, Walk or Fixed.
- Scroll: stand in for a viewer's scrolling. With drives the timeline checked, scrolling plays the piece.
- Done: back to editing. Esc or the Preview button works too.
Whatever the camera does in Preview isn't saved. See Preview mode.
The Menu
Click Menu to open it. It has three parts: Project, Export (with imports and backups), and Scene. Items with › open a submenu when you hover them.
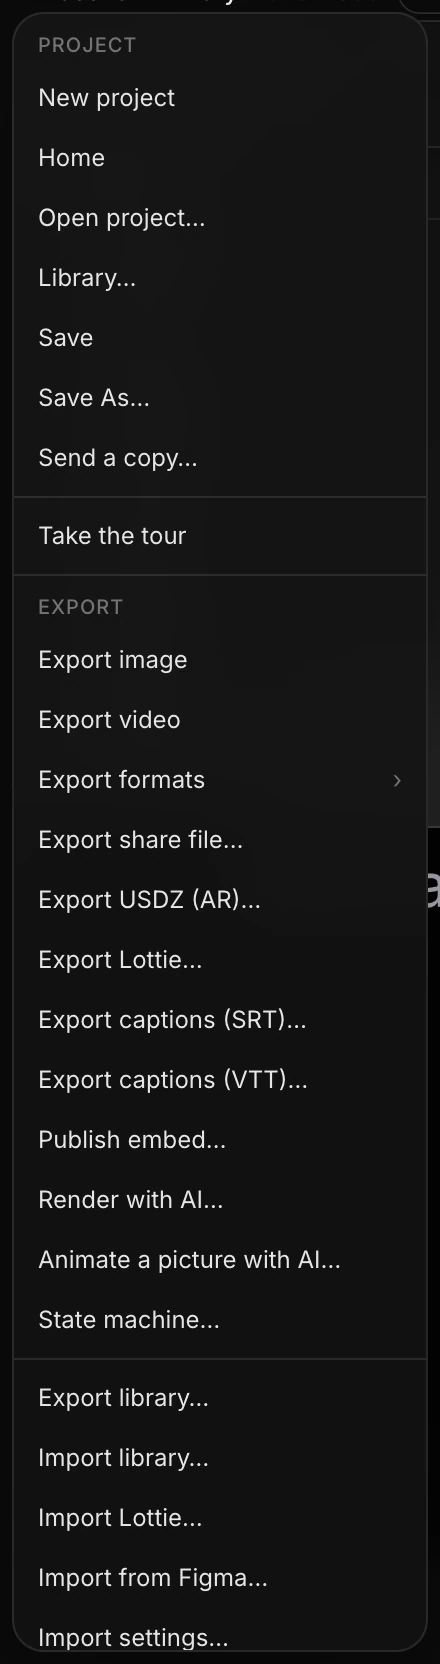
Project
| Item | What it does |
|---|---|
| New project | Starts a blank 1920×1080 scene. If you changed the scene you had open, it's saved first. |
| Home | Goes to the home page. The scene stays open behind it. |
| Open project… | Opens the Projects panel, with every project you've saved. |
| Library… | Your models, components and design systems, your published templates, and the community's. |
| Save | Saves the open project. The first time, it asks for a name. |
| Save As… | Names a project Paraplex named for you; on a project you named, saves a copy under a new name and switches to it. |
| Send a copy… | A link that gives someone their own copy. Needs sign-in. |
| Take the tour | A six-step tour of the editor. |
See Saving your work.
Export
| Item | What it does |
|---|---|
| Export image (PNG) | Downloads the frame at the playhead, using the Image Export settings. |
| Export video | Downloads the piece, using the Video Export settings. The Export Video button at the bottom of the properties panel does the same and shows its progress. |
| Export formats › | Turns export formats on and off (Landscape 16:9, Vertical 9:16, Square 1:1, Portrait 4:5, Classic 4:3). Also has Show artboards and Export all enabled…. See Formats and artboards. |
| Export share file… | Downloads a file that anyone can open to watch the piece. |
| Export USDZ (AR)… | A 3D file of the current frame for AR Quick Look on iPhone, iPad and Vision Pro. See USDZ for AR. |
| Export Lottie… | The flat parts of the scene as a Lottie animation. See Lottie. |
| Export captions (SRT)… and (VTT)… | Caption files for YouTube and other players. See Captions. |
| Publish embed… | Code to put the piece on a website. Needs sign-in. |
| Render with AI… | Restyles a stretch of the scene with an AI video model. Uses credits. See Render with AI. |
| Animate a picture with AI… | Turns a picture into a video clip. Uses credits. See Animate a picture with AI. |
| State machine… | Opens the State machine panel, for interactive pieces. See State machines. |
| Export library… and Import library… | Back up, and restore, every project and design system in one file. See Backing up your library. |
| Import Lottie… | Brings a Lottie animation in as layers. |
| Import from Figma… | Opens a file saved by the Send to Paraplex plugin. See Figma plugin. |
| Import settings… and Export settings | Load or save the open scene as a settings file. |
Scene
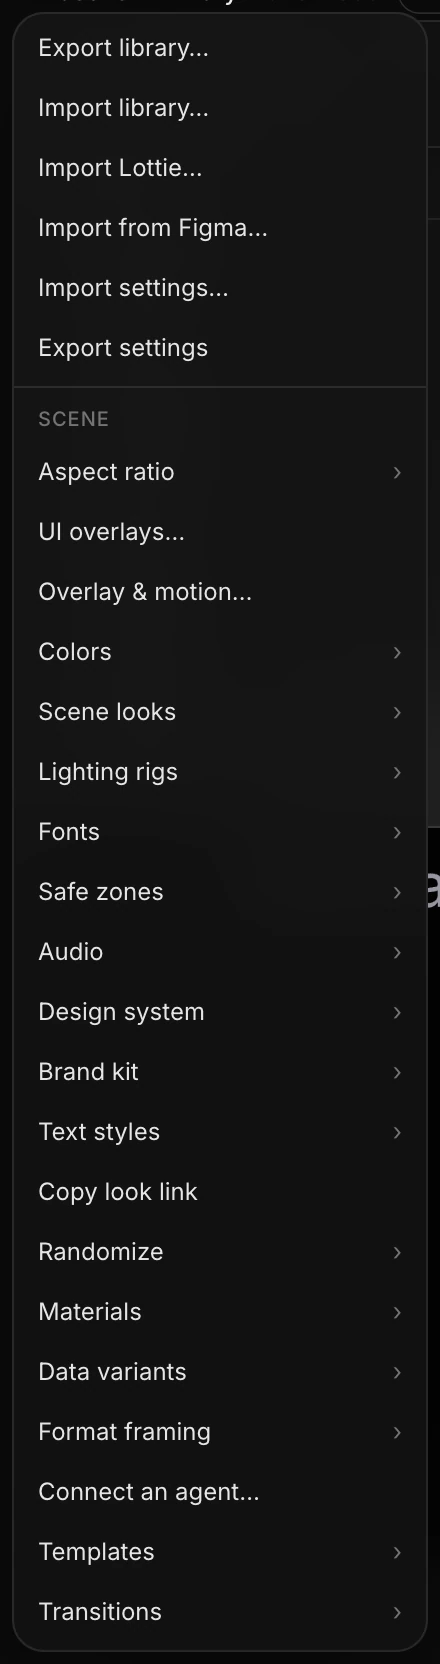
| Item | What it does |
|---|---|
| Aspect ratio › | Sets the canvas to one of seven shapes, from 16:9 to 9:16. See Canvas size and setup. |
| UI overlays… | Browser and phone frames, overlays and cursor paths. See UI overlays and cursors. |
| Overlay & motion… | Opens the Overlay panel, for a wash of color and motion over the whole frame. |
| Colors › | Your saved colors (click one to apply it to the selected layer), Save fill as color…, Edit palette… and Import tokens (JSON)…. See Colors, tokens and themes. |
| Scene looks › | Apply a saved look, or Save current look…. See Scene looks and Randomize. |
| Lighting rigs › | Apply a saved set of lights (it replaces the scene's lights), or Save current lights…. |
| Fonts › | Your uploaded fonts, and Upload font (TTF/OTF)…. See Fonts. |
| Safe zones › | Shows where TikTok, Instagram Reels, YouTube Shorts or the Instagram feed cover the frame. |
| Audio › | Add audio clip… and Detect beats…. See Audio. |
| Design system › | Apply one of your design systems, open Brand assets…, or Apply with AI…. See Design systems. |
| Brand kit › | Export kit… and Import kit…. See Brand kit and assets. |
| Text styles › | Sixteen ready-made type looks, your project's own styles, Save current style… and Update followed style…. See Text styles. |
| Copy look link | Copies a link to this scene's look. |
| Randomize › | Rolls new values for the selected shape's Glass, Light or Panel settings, as one undo step. |
| Materials › | Material presets and your saved materials, Save current material… and Update followed material…. See Materials and appearances. |
| Data variants › | Import sheet (CSV)… and Export all variants…. See Data variants. |
| Format framing › | Preview each export format, then Save this framing or Reset to auto framing. |
| Connect an agent… | Lets an AI agent such as Claude Code work in this tab. See Connect an agent. |
| Templates › | Save as template…, then every template. Choosing one replaces the scene. |
| Transitions › | Transitions panel…, then ready-made transitions for the start or end of the piece. See Clips and transitions. |
Tip
A few commands aren't in the Menu at all. Find them with search (⌘ K): Add a note, Make this the home view, Keyboard shortcuts, Open the assistant, Preview mode and Feedback for the assistant….