
Audio
Sound turns an animation into a video: music under a promo, a voiceover for an explainer, a whoosh as a title lands. Audio tracks are layers with clips on the timeline, and they're mixed into your MP4 or WebM when you export.
Add a sound
Click Audio track in the dock, then choose a sound file: MP3, WAV, M4A or anything else your browser can play.
Press and hold Audio track for more:
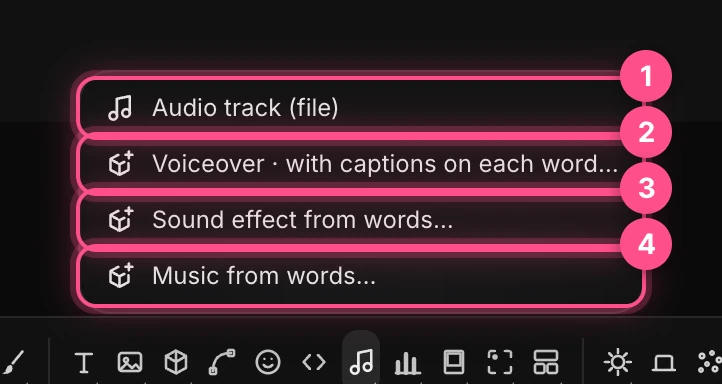
- Audio track (file) adds a sound file, like a click on the button.
- Voiceover reads your script aloud in a voice you choose, and can write a caption for each word as it's spoken.
- Sound effect from words makes a sound from a description: "a soft whoosh", "glass clinking".
- Music from words makes a music bed from a description.
The last three are made with AI and use credits. See Voiceovers, sound and music.
Menu › Audio › Add audio clip… adds a file too. The file is stored inside your project.
Note
Videos you add play silently. To use a video's soundtrack, save it as an audio file and add that. See Images and video.
The clip
An audio track is a layer with a clip on the timeline. Select it to see its waveform: tall peaks are loud moments, like drum hits.
- Drag the clip to move the sound in time.
- Drag its ends to trim it. Trimming the start makes the sound start later; it doesn't skip into the file. To start partway into the file, use Start at (below).
A new clip runs the whole length of the timeline. If the file is shorter, the rest is silence; the sound doesn't loop.
Volume, fades and start
With an audio track selected, a bar above the dock holds its settings.

- Volume: from 0 to 100.
- Fade in and Fade out: how many seconds the sound takes to rise at the start of the clip and fall at its end.
- Start at: where in the file playback begins, in seconds. Set it to
12to skip a 12-second intro. - Mute silences the track and keeps everything else as it is.
If the fades add up to more than the clip, they shrink to fit and the bar says so. Hiding the layer (the eye in the Layers panel) silences it too.
Volume stays the same for the whole clip: it can't be keyframed.
Time things to the beat
Markers are thin amber lines on the timeline that mark moments, like the beats of your music. Clips snap to them when you drag or trim, so a title can land exactly on a drum hit.
Detect beats listens to a track and drops a marker on each hit:
- Select the audio track.
- Choose Menu › Audio › Detect beats…, or click Detect beats in the quick-actions strip.

- The clip, with its waveform. Each hit has a marker above it.
- Markers: the count, with ⌃ to add a marker at the playhead (or press M with the timeline open) and ✕ to clear them all.
A message tells you how many beats it found, and the tempo when the beat is steady. It works best on music with a clear, percussive beat; a soft pad or a voice may give no beats at all. Running it again doesn't double up markers.
Tip
Markers guide clips, not keyframes: keyframes don't snap to them. Put the playhead on a marker by eye, then set your keyframe there. See Syncing to audio.
You can't delete one marker on its own. ✕ clears them all.
Export with sound
Export Video mixes every audio track into the file:
- MP4 carries the sound as AAC, which plays everywhere.
- WebM, including transparent WebM, carries it as Opus.
- GIF and PNG sequence have no sound.
The mix starts where the export starts. A piece can be up to 60 seconds long. See Exporting video.
Important
If your browser can't encode sound, the video exports silently without saying so. Play your export once before you share it.