
Canvas and viewport
The canvas is the big area in the middle of the editor. It shows your scene through the camera, inside the frame, with room to work around it.
To orbit the camera, zoom and pan, and get back to the starting view, see Moving around the canvas.
The frame
The frame is the rectangle labeled with your scene's name and size, such as Scene · Primary 1920×1080. What's inside the frame is what you export.
The dark space around the frame is your workspace. Layers that sit outside the frame aren't in the export, so they're a handy place to park things. Notes can go there too. See Notes.
Artboards: the same scene in other shapes
When your piece has more than one export format, each format appears as an artboard beside the frame, showing the scene reframed for that shape.
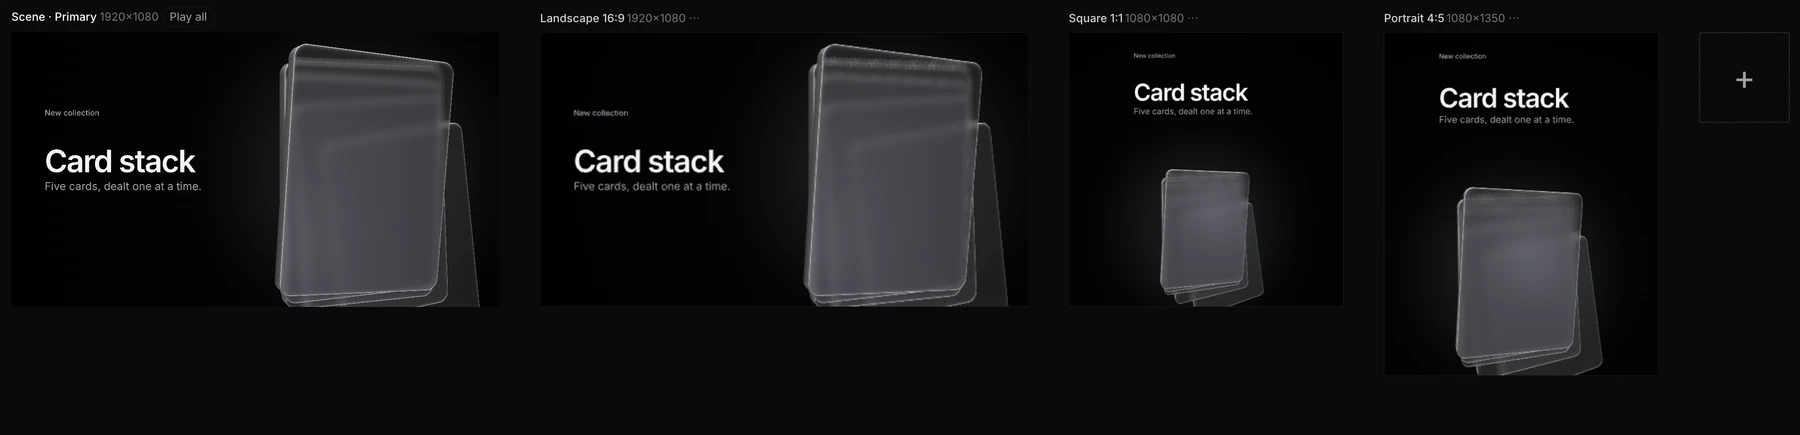
- Click an artboard to work on it. The frame takes that artboard's size and camera, and a banner says you're editing it. Changes you make apply to that artboard only, unless you click Apply to all. Click Back to scene when you're done.
- The ⋯ beside an artboard's name has Rename…, Resize…, Breakpoint…, Make primary, Duplicate, Remove, and how the scene should be framed in it.
- The + tile adds a format: Landscape 16:9, Vertical 9:16, Square 1:1, Portrait 4:5, Classic 4:3, or a custom size.
- Play all keeps every artboard moving while you play. Otherwise they show stills, so the editor stays fast.
To fit all the artboards on screen, choose Menu › Export formats › Show artboards. See Formats and artboards.
Select and edit on the canvas
- Click a layer to select it. Shapes get a blue outline, and every layer gets a gizmo. Click an empty spot to deselect.
- Hold ⌥ (Alt) and click to select the layer behind the selected one.
- Double-click text to type in it, or a path to edit its anchors.
- Drag a gizmo handle to move, rotate or scale. In 2D design mode, drag the layer itself.
Note
Clicks on the canvas are ignored while the animation plays, so pause first. To select several layers, use the Layers panel: Shift-click doesn't add to the selection on the canvas.
Drop files onto the canvas
Drag files from your computer straight onto the canvas:
| You drop | What happens |
|---|---|
| An image or video onto a shape | It becomes the shape's picture, replacing any it had. A plain shape takes the picture's proportions, a frame puts it in its picture slot, a sphere or other solid wraps it around, and a 3D device shows it on its screen. |
| An image onto empty canvas | A new shape holding the image, at the image's proportions |
| A video onto empty canvas | A new video layer |
| A 3D model (.glb, .gltf) or a Gaussian splat (.ply, .spz, .splat, .ksplat, .sog) | A 3D model or splat layer. See 3D models and splats. |
| A Lottie animation (.json, .lottie) | The animation as editable layers. See Lottie. |
| A file from the Send to Paraplex Figma plugin | Your Figma frames as layers. See Figma plugin. |
| Several files at once | The first goes onto the shape under the pointer, and the rest become new layers |
Tip
An SVG file dropped on the canvas arrives as a flat picture. For editable vector shapes, copy the SVG and paste it (⌘ V), or use the dock's Vector (SVG) button. See SVG and vectors.
Fonts, spreadsheets and other files aren't taken by a drop. Use the Menu for those.
Right-click menus
Right-clicking the canvas opens the menu for what's selected, not for whatever is under the pointer:
- With a layer selected, you get that layer's menu, the same as right-clicking its row in the Layers panel. See Layers panel.
- With nothing selected, you get the canvas menu.
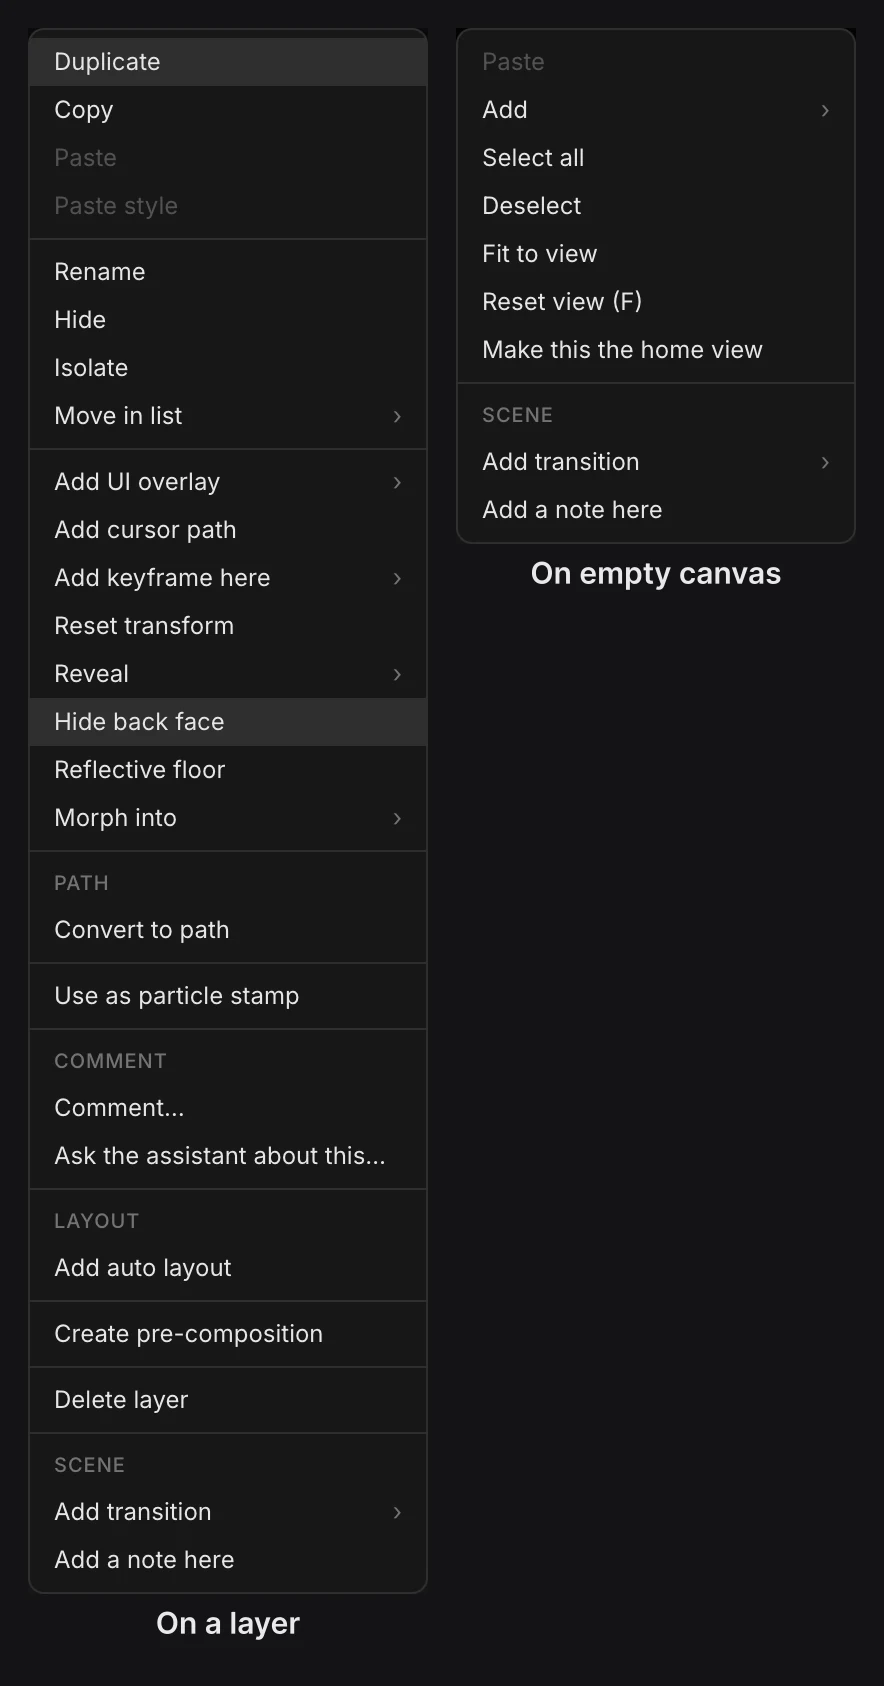
| Canvas menu item | What it does |
|---|---|
| Paste | Pastes the layers you last copied |
| Add › | Adds a shape, text, image, 3D model, light, particles, backdrop or group |
| Select all | Selects every top-level layer |
| Deselect | Clears the selection |
| Fit to view | Sets the zoom back to 100% and centers the frame |
| Reset view (F) | Puts the camera back to the scene's home view |
| Make this the home view | Makes the current camera angle the one Reset view returns to |
| Add transition › | A transition for the start or end of the piece |
| Add a note here | A note where you right-clicked |
Guides on the canvas
These show on the canvas while you work, and never in exports:
- Safe zones for social apps, from Menu › Safe zones. See Canvas size and setup.
- The 8-point design grid in 2D design mode.
- Notes, and the Isolated pill when you've isolated layers.
How sharp the canvas looks
Preview resolution, at the bottom of the properties panel, sets how sharp the canvas is while you edit: 1× is the sharpest, and 0.75×, 0.5× and 0.25× draw fewer pixels. If a heavy scene plays slowly on your computer, lower it. Your exports are unaffected: their size is Export resolution scale, beside it.